Inspirational Math: Tiling A 11x13 Rectangle
Forgive the handwriting.
The problem I chose to explain was the 11X13 Rectangle Tiling activity because I felt it showed the best progressive growth. How this works is, you are given an 11x13 rectangle and you have to fit the least amount of squares into the shape. This can be done many ways (as shown below), but the goal is to fill the rectangle with the least amount of squares. The hardest aspect, was deciding which method was best, and not knowing which was preferable, so I had to try the two I thought of: Largest Square Possible and The Averaging Method. The largest square method is what I tried in the first attempt.
The problem I chose to explain was the 11X13 Rectangle Tiling activity because I felt it showed the best progressive growth. How this works is, you are given an 11x13 rectangle and you have to fit the least amount of squares into the shape. This can be done many ways (as shown below), but the goal is to fill the rectangle with the least amount of squares. The hardest aspect, was deciding which method was best, and not knowing which was preferable, so I had to try the two I thought of: Largest Square Possible and The Averaging Method. The largest square method is what I tried in the first attempt.
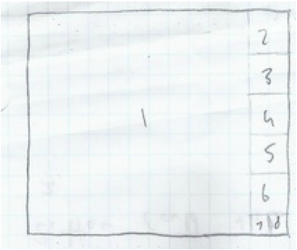
First AttemptOn my first attempt, I tried to make the biggest square I could, and compensating for the rest with smaller squares. This left me with 8 squares, which by comparison with others, was pretty good.
|
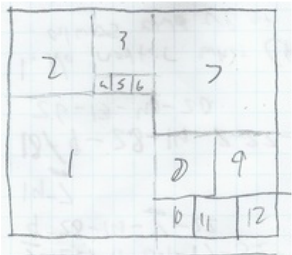
Second AttemptConvinced that a spread out layout was the best way, I attempted this design, but ended up with 12 squares. This was because the dimensions of the larger squares were offset.
|
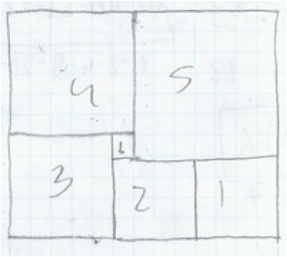
Third AttemptMy third attempt was approached with a similar mindset as the second, but with slightly different dimensions, this time resulting in 6 squares; the lowest anyone has gotten.
|
